![]() November 3, 2013 11:57
November 3, 2013 11:57
![]() Blogger
Blogger
![]() October 27, 2013 12:34
October 27, 2013 12:34
![]() Blogger
Blogger
First Try at Polypainting


![]() October 25, 2013 15:30
October 25, 2013 15:30
![]() Blogger
Blogger
Normal & Ambient Occlusion Map Test


Now that I can see that the UVs turned out ok, I will continue to polypaint. I will have to watch a few tutorial videos, but I'm sure it will be fine. Thanks for reading!
![]() September 21, 2013 12:59
September 21, 2013 12:59
![]() Blogger
Blogger
Quick Start to ZBrush: Volume 2 - Progress
And while I am very pleased on how much progress I have done in the last month, I realized that there is no way I learn a software package as big as ZBrush on my own. So instead of jumping on my next personal project of learning ZBrush on my own, I decided to go back and finish at least another couple of volumes of ZBrush.
Here is a render of my progress so far on Volume 2:


I had to sculpt the base mesh, and use ZRemesher to get a lower resolution mesh with higher resolution on the face and the hands.
That's all for now, thanks for reading!
![]() September 15, 2013 04:38
September 15, 2013 04:38
![]() Blogger
Blogger
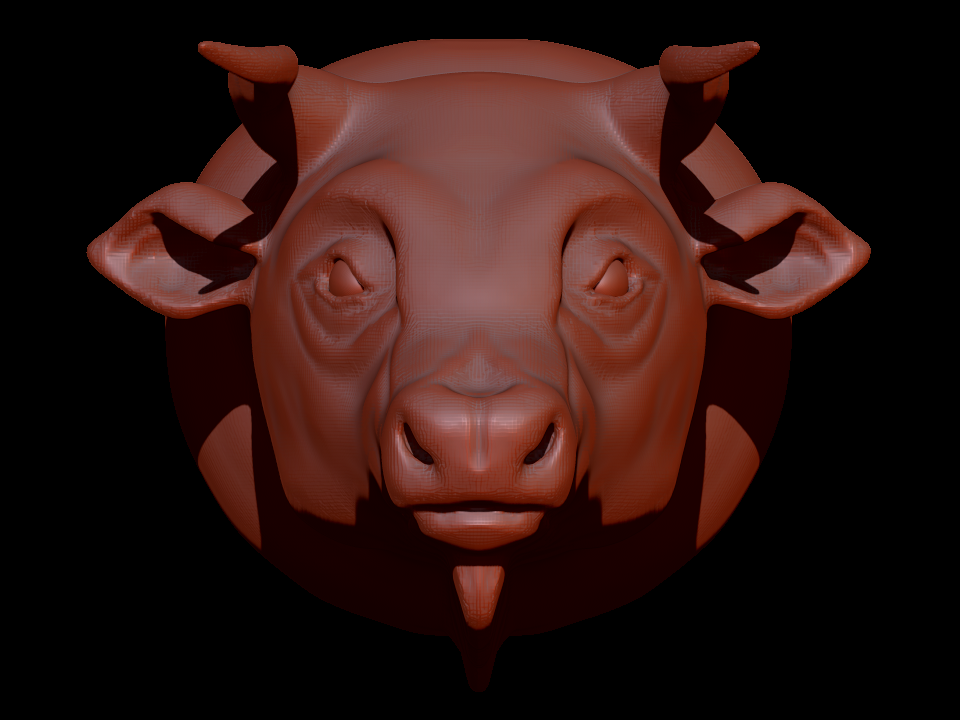
Final Render of Bull's Head Sculpt


- I changed the horns, since I realized that they were pointing straight and they should be up at an angle with some curvature.
- I added a nose ring, I thought that it was appropriate and added character to the sculpt.
- I removed the skin flap under the mouth. I was thinking of making it hair, but I gave up on that idea.
![]() September 10, 2013 13:32
September 10, 2013 13:32
![]() Blogger
Blogger
Bull Head Sculpt WIP
After a few hours of sculpting here is my progress so far:


![]() September 1, 2013 04:35
September 1, 2013 04:35
![]() Blogger
Blogger
Werewolf Head Sculpt
Here are the renders:


![]() August 16, 2013 04:05
August 16, 2013 04:05
![]() Blogger
Blogger
2nd Head Sculpt
Hopefully, once I'm on my 15th sculpt, I will be much faster and much better than what I am today.
Here are the renders for today's work:


Yesterday I did the sculpt without reference, and I it turned out horrible because of it. I tried to see how well I could do if I just left it up to my imagination.
Anyways, I've learned my lesson and for today's sculpt I followed this YouTube video:
It isn't a step-by-step video, its a quick rendering of an artist work into a 15 minute video. I paused and rewind the video as many times as I need to see how the artist was doing his work. I learned some really cool tricks and a different way to start a head sculpt.
For tomorrow I will try to find a woman's head that I can sculpt, and maybe even add hair! :O Well, that's all for now, thanks for reading!
![]() August 15, 2013 16:02
August 15, 2013 16:02
![]() Blogger
Blogger
30 Head Sculpts in a Month Challenge
My friend Brandon Rees is now a tech artist for EA Tiburon, and he gave me this great idea. He said that I should take no more than an hour per sculpt, after a while what used to take me 20 minutes to do will be done in half the time.
I will have to admit that I cheated on this head sculpt since I spent almost 2 hours doing it. I know that it looks really crappy for 2 hours worth of work, but it took me a while to figure dinamesh and all that set up stuff. Anyways, here are the renders from ZBrush:


![]() August 12, 2013 02:26
August 12, 2013 02:26
![]() Blogger
Blogger
Quick Start to ZBrush: Volume 1 Assignment

I decided that I'm going to create like a rocky beach and I will eventually learn how to make a treasure chest of some sort and put it on top of the middle pedestal with other things around it as props. It doesn't look like it from this angle, but I made it so that the part that is sunk in is lower than the rocky part. I don't know if I can do this is Zbrush, but if not I'll figure out how to do it another way, but I'm planning on adding water of some kind to that it looks like a beach.
Hopefully my plan works, since I can see it so well in my mind. If I have time, I'll try to sketch out a concept of what I mean over the week.
Now its time to start volume 2 and learn some more Zbrush! Thanks for reading!
![]() August 10, 2013 01:34
August 10, 2013 01:34
![]() Blogger
Blogger
Quick Start to ZBrush: Volume 1 - Done
I have finished watching all the video and I've been following along, and been doing my own model. I downloaded the project files just in case I needed them, but it turns out that its probably just better to do everything my self.
Here is a quick render of what I have after the first lesson:

I also took the test, and I only got 1 answer wrong giving me a grand total of 93% for the final test.
Next, I will do the homework assignment and create another terrain on my own. Hopefully by the time I'm done I will have 2 finished assets and know my way around Zbrush.
To be fair, I was always scared of zbrush because its so different from what I'm used to with Maya. All the controls felt weird, but after a good couple hours of working in Zbrush, I'm actually really liking this software package and hope that I can keep getting better.
That's all for now, thanks for reading!
![]() July 12, 2013 23:57
July 12, 2013 23:57
![]() Blogger
Blogger
Fifth Day of Teaching
Today was mainly about getting the students to do 3d modeling on their own, so I was mainly jumping around helping students with questions. The students had freedom to make almost anything they wanted, but I made sure that it wasn't too complicated.
One of the students was trying to redo the companion cube on his own, another made a computer, and made a cake. Even though it was a short week, the students got really good at the basics of Maya. I gave them links to other resources like Digital Tutors to help them keep progressing in their 3d modeling.
That's all for now, thanks for reading!
![]() July 11, 2013 22:34
July 11, 2013 22:34
![]() Blogger
Blogger
Fourth Day of Teaching
![]() July 11, 2013 01:51
July 11, 2013 01:51
![]() Blogger
Blogger
Third Day of Teaching
The point of today's lesson was a simple introduction to how UV's and materials work in Maya. Since this is a one week course, there is no way to teach everything there is to know about Maya but at least a simple intro would do.
I gave the students access to this file that I got from one of my professors when I was going to school. This is a really simple Maya scene and the main point is to make it look more complex than it really is. Applying a few simple tileable textures can really make the difference on that scene.
It won't look like a AAA game quality work, but the point of this exercise is to get a general idea of how textures work in Maya. That's all for now, thanks for reading!
![]() July 9, 2013 21:08
July 9, 2013 21:08
![]() Blogger
Blogger
Second Day of Teaching
To start things off, today I went over the overall process of the art pipeline using this great article I found on IGN. It does a really good job at explaining the overall process but with the right amount of detail that its not too general. I also added some of my personal experience with game development with how some parts of the pipeline can be affected if you skip over or don't do some of the things in the article.
After that we created the basic model for a fire hydrant. It took a while to get started since Maya is still really new to them, but we managed to get through it. At the end, I showed them how to add some of the other detail since we wouldn't be able to keep going with the lecture without going over on time.
I hope that I will get less and less nervous while talking as time goes on, I think that's part of the reason that I start to speak faster. When I get nervous, I start to speak faster so I may lose some of the students. That's all for now, thanks for reading.
Archive
- September 2016
- August 2016
- June 2016
- May 2016
- April 2016
- March 2016
- February 2016
- January 2016
- December 2015
- November 2015
- October 2015
- September 2015
- August 2015
- July 2015
- June 2015
- May 2015
- April 2015
- March 2015
- February 2015
- January 2015
- November 2014
- October 2014
- September 2014
- August 2014
- June 2014
- May 2014
- April 2014
- March 2014
- February 2014
- January 2014
- December 2013
- November 2013
- October 2013
- September 2013
- August 2013
- July 2013
- June 2013
- May 2013
- April 2013
- March 2013
- February 2013
- January 2013
- December 2012
- November 2012
- October 2012
- September 2012
- August 2012
- April 2012
- March 2012
- February 2012
- January 2012
- December 2011
- November 2011
- October 2011
- September 2011
- August 2011
- March 2011
- February 2011
- January 2011
- December 2010
- November 2010
- October 2010
I still need to finish the color on the ears, a different color for the nose & nose ring, eyes, and another pass at the horns. But overall, I am really liking my progress on my bull.
That's all for now, thanks for reading.