![]() August 27, 2015 04:03
August 27, 2015 04:03
![]() Blogger
Blogger
![]() August 20, 2015 12:47
August 20, 2015 12:47
![]() Blogger
Blogger
Low Poly Sword - Poly Painted

So I just finished painting the sword in ZBrush and now just need to bake all the maps so I can render the low poly model with the color and normal map of this version from ZBrush.
I was hoping that I was going to be able to finish this morning, but it will still take a few more hours to finish and apply a toon shader for the sword to make it look the way I want. That's all for now, thanks for reading!
![]() August 20, 2015 01:18
August 20, 2015 01:18
![]() Blogger
Blogger
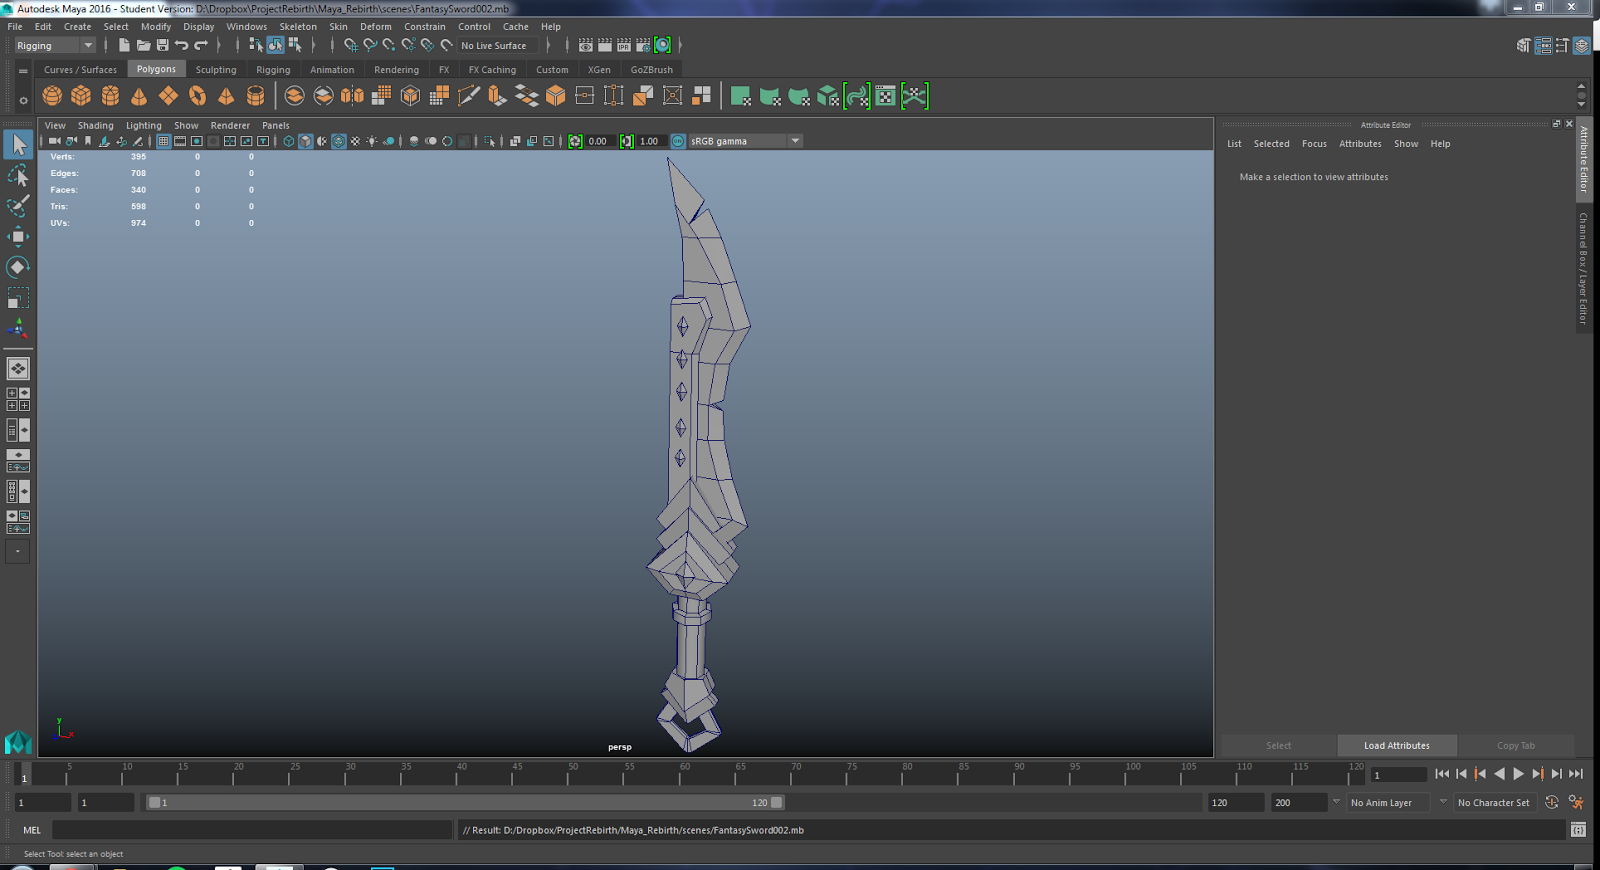
Low Poly Sword - Detailed

So yesterday I finished the low poly model of the sword, so today I decided to finish the high poly model. There really isn't all that much detail on it, but its enough that I will be able to get a good normal map.

I think that the one part that has the most detail, and I don't know if I wasted all my time is in the hilt. I made some grooves on the handle for the grip since this is a one handed sword. I added some dent and scratches throughout the sword and now I have to paint the model. That's all for now, thanks for reading!
![]() August 19, 2015 01:01
August 19, 2015 01:01
![]() Blogger
Blogger
Low Poly Sword
So I know that I jump from one project to another fairly quickly, but that's because I am always trying to work on something different. I decided to go back to something I haven't done in a long time, low poly modeling.
I have just finished the sword and I will work on a shield next. That's all for now, thanks for reading!
![]() August 15, 2015 22:17
August 15, 2015 22:17
![]() Blogger
Blogger
Making a Lights Out Game in Unity 5 - Part 2

So I was trying to finish this today, but I guess I didn't work fast enough. I am actually almost done with the game, but the most important part of the game so far is the level editor that allows us to create levels on the fly and save them to a text file.
The little script is designed check which of the light switches are "on" and then writes it to a text file. Then I manually copy it over to an XML file that reads it to load levels. I will continue to work on this and hopefully I will be done tomorrow. That's all for now, thanks for reading!
levelEditor.cs:
using UnityEngine;
using System.Collections;
using System.IO;
public class levelEditor : MonoBehaviour {
public string levNumber;
string runtimeLevels;
// Use this for initialization
void Start () {
}
// Update is called once per frame
void Update () {
}
public void setLevelName(string nr) {
levNumber = nr;
}
public void ClearButton(){
for (int i = 1; i < 26; i++) {
if (GameObject.Find (i.ToString ()).GetComponent<lightSwitch> ().isOn) {
GameObject.Find (i.ToString ()).GetComponent<lightSwitch> ().change ();
}
}
}
public void SaveButton(){
string levelstring = "";
for (int i = 1; i<26; i++) {
if (GameObject.Find (i.ToString ()).GetComponent<lightSwitch> ().isOn) {
if (levelstring.Length == 0)
levelstring = i.ToString ();
else
levelstring += "," + i;
}
}
runtimeLevels +=
"\n\n" +
"<level>" + "\n" +
"<levelname>" + levNumber + "</levelname>" + "\n" +
"<setup>" + levelstring + "</setup>" + "\n" +
"</level>";
System.IO.File.WriteAllText("D:/Documents/Unity Projects/LightsOut/Assets/Resources/editor.txt", runtimeLevels);
}
}
![]() August 15, 2015 01:56
August 15, 2015 01:56
![]() Blogger
Blogger
Making a Lights Out Game in Unity 5 - Part 1

So a while ago I did a few Unreal Engine tutorials, and now I am doing some tutorial to learn Unity 5 from Digital Tutors. This tutorial is about making a simple game of lights out for mobile devices using C#.
The screenshot above shows the simple set up of the game so far. I made a cube and attached a couple of scrips and made a prefab out of the cube game object. The scripts that I wrote so far are at the bottom of this entry.
There is also a simple XML file that I made that makes it possible to "create" a level by typing out which cubes should be in the "on" or "off" position. This should come in had later when I need to make more levels.
I have only finished 4 of the tutorial episodes so far, I will post more stuff as I'm done. That's all for now, thanks for reading!
lightSwitch.cs
using UnityEngine;
using System.Collections;
public class lightSwitch : MonoBehaviour {
public bool isOn = false;
// Use this for initialization
void Start () {
}
// Update is called once per frame
void Update () {
}
public void change(){
if (isOn) {
isOn=false;
this.transform.localEulerAngles = new Vector3 (0,45,0);
}else{
isOn=true;
this.transform.localEulerAngles = Vector3.zero;
}
}
}
turnManager.cs
using UnityEngine;
using System.Collections;
public class turnManager : MonoBehaviour {
// Use this for initialization
void Start () {
int count = 1;
for (int i = 0; i < 5; i++) {
for (int j = 0; j < 5; j++) {
GameObject tmpGb = Instantiate (Resources.Load ("Cube", typeof(GameObject))) as GameObject;
tmpGb.transform.position = new Vector3 (j * 1.5f - 3, i * -1.5f + 3, 0);
tmpGb.name = count.ToString ();
count++;
}
}
this.gameObject.GetComponent<levelHandler> ().loadLevel (1);
}
// Update is called once per frame
void Update () {
if (Input.GetMouseButtonUp (0)) {
RaycastHit hit = new RaycastHit ();
Ray ray = Camera.main.ScreenPointToRay (Input.mousePosition);
if (Physics.Raycast(ray, out hit, 100)) {
makeMove (int.Parse(hit.collider.gameObject.name));
}
}
}
void makeMove(int name){
turn (name);
turn (name + 5);
turn (name - 5);
if (name % 5 != 0) {
turn (name + 1);
}
if (name % 5 != 1) {
turn (name - 1);
}
}
void turn(int name) {
if (name < 1 || name > 25)
return;
GameObject turnObj = GameObject.Find (name.ToString ()).gameObject;
turnObj.GetComponent<lightSwitch> ().change ();
}
}
levelHandler.cs
using UnityEngine;
using System.Collections;
using System.Xml;
using System.Collections.Generic;
public class levelHandler : MonoBehaviour {
XmlDocument levelDoc;
XmlNodeList levelList;
List<string> levelArray;
// Use this for initialization
void Start () {
levelArray = new List<string> ();
levelDoc = new XmlDocument();
TextAsset xmlfile = Resources.Load ("levels", typeof(TextAsset)) as TextAsset;
levelDoc.LoadXml (xmlfile.text);
levelList = levelDoc.GetElementsByTagName("level");
foreach (XmlNode leveldata in levelList) {
XmlNodeList levelinfo = leveldata.ChildNodes;
Debug.Log (levelList.Count);
foreach (XmlNode data in levelinfo) {
Debug.Log(data.Name);
if(data.Name == "setup"){
Debug.Log(data.InnerText);
levelArray.Add(data.InnerText);
}
}
}
}
// Update is called once per frame
void Update () {
}
public void loadLevel(int nr){
string[] levString = levelArray [nr - 1].Split(',');
foreach (string brick in levString){
GameObject.Find(brick).GetComponent<lightSwitch>().change();
}
}
}
![]() August 13, 2015 03:24
August 13, 2015 03:24
![]() Blogger
Blogger
Drawing - Supergirl

As I said before, I have been trying to draw more often. This time I drew Supergirl and did some quick shading. That's all for now, thanks for reading!
![]() August 5, 2015 03:36
August 5, 2015 03:36
![]() Blogger
Blogger
Texture Tuesday - August 4

![]() July 29, 2015 03:15
July 29, 2015 03:15
![]() Blogger
Blogger
Drawing - Genderbent Vega

So I have been trying to squeeze more time drawing and this is what I drew, its suppose to be Genderbent Vega from Street Fighter. Anyways, that's all for now, thanks for reading!
![]() July 21, 2015 05:02
July 21, 2015 05:02
![]() Blogger
Blogger
Building My PC - Getting an SSD

So I know that this has nothing to do with art, but I recently built my own PC, but I didn't get an SSD since they were kind of expensive. The other day I found a good deal on Newegg for a 250 Gb Crucial MX200 SSD.

It arrived earlier today and I have been working on my PC for the last couple hours while I figured out how to install the drive on my case. I was freaking out since I thought I forgot to buy the part to mount it on my case, but then I remember that I could just screw the drive to one of the bays it already comes with (pictured above). It is now 3 in the morning and I am happy to say that the OS and all the main drivers are installed.
While I am really tired, I really would like to point out how games run off the new drive. I got Arkham Knight at launch for my PC, and it had a ton of problem running off my regular mechanical hard drive. But with the new SSD, most of the stuttering and other issues are now gone and plays really well on my machine.
I still have a bunch of software to reinstall, but for now I need to get some sleep. That's all for now, thanks for reading!
![]() July 13, 2015 02:44
July 13, 2015 02:44
![]() Blogger
Blogger
Anime Drawing - Sakurai from Rail Wars

Anyways, I don't think I will coloring this one, so this will be as far as I take this one. I need more practice in 2D art, so I will try to have more of these more often. As you can probably tell, I still have a long way to go on my line work. That's all for now, thanks for reading!
![]() June 15, 2015 00:16
June 15, 2015 00:16
![]() Blogger
Blogger
Making a First Person Shooter in Unreal Engine - Part 4

Last time I finished implementing the last few things that would actually end the game and just reload the same level. This time I had to implement the event graph for a secret path that lets the player shave a few seconds of their time in the game. The picture above shows the network that does a few different things: it checks to make sure you entered/exited the trigger sphere for the door and another that actually makes the doors slide down.

The picture above is of the final state of the game. The green stop watch is the bonus pick-up that reduces the player's final time by 3 seconds and you can also see the target. These two types of pick-ups are spreed around the level and the player has to shoot them to activate them. You can also see your current ammo on the bottom left corner and your current time on the top right corner.

The picture above is of the final screen that shows the stats for the player. This breaks down exactly how much "real" time they took, any time reductions if they got the timer pickups, and the final time. It also tracks how many targets the player hit and how many were destroyed. For this game I made it so each target could only be destroyed if it was hit 3 times, that is why it shows that I hit 1 target, but didn't destroy any of them.
I found that in Unreal you can create a destruction mesh out of an object and you can have a mesh shatter to pieces. I have tried to create one out of the target mesh, but I haven't been able to do it on my own since this part isn't in the tutorial. I will keep trying to do it on my own and will make a post if I figure it out. Thanks for reading!
![]() June 11, 2015 23:55
June 11, 2015 23:55
![]() Blogger
Blogger
Making a First Person Shooter in Unreal Engine - Part 3

Since last time, I created a way for the player to be able to finish the level. This consists of the player running through the map and "pushing" a button on the final room. For this end state, I have collision sphere around the button that displays a couple lines of text once the player is inside the sphere. If the player press the space bar as the instructions say, they will be unable to fire their gun or move.

Here is a closer look at how the network for firing the gun and moving around the map have been laid out. Please note that I have a few variables that I use to make sure that the player can't fire their weapon or can't move once the end game sequence has been started.
I hope that I can finish the tutorial soon, but since I have been staying late at work everyday I don't have much time to work on this. Thanks for reading!
![]() June 8, 2015 23:26
June 8, 2015 23:26
![]() Blogger
Blogger
Making a First Person Shooter in Unreal Engine - Part 2

The screenshot about is the network I made for the flotation of targets that will be around the level. These targets have a static mesh and a particle system that make it look like they are floating thanks to a couple of rockets on the bottom of the target.
But since it would be weird to just have the target levitating perfectly still, we added this effect that moves the object ever so slightly up-and-down. Also, I added a delay with a random value to make sure that each target doesn't move at the exact same time.

Next was a brief introduction into Widget Blueprints, this is a builtin way for Unreal Engine to display a UI to your player. For now I have just set up the 4 different elements in the UI to keep track of the ammo the player has and the current time that the player has spent on the level. On the next few lessons I will learn how to do Data Bindings so the UI can update in real time.
That's all for now, thanks for reading!
![]() June 2, 2015 00:29
June 2, 2015 00:29
![]() Blogger
Blogger
Making a First Person Shooter in Unreal Engine - Part 1
I have decided that I am ready to learn more about the engine and learn how to make a First Person Shooter in Unreal, all thanks to Digital Tutors. I really like their site, they have helped me out a ton recently and I only wish that I would have taken advantage of it a couple of years ago.
Anyways, I have now started to the lesson and have started to make make some functions in Unreal, mainly this one:

When you start the lesson, the world is already set up for us so it gives us time to concentrate on only making the Blueprints for the game play to work the way we want it. This node network was created to help us actually shoot from the gun we already have set up. Essentially we get the location of the center of the screen and do a line trace to check if we hit anything along the line. I know that its kind of basic, but I just really like that we are able to do all this using Blueprints and not actual C++ code.
At this time I haven't gotten too far into the series, but I will keep working on this as much as possible over the next few days. I image that this series will take me at least a week to finish since there are 40 lessons total, so hopefully I can work through them fairly quickly. Thanks for reading!
Archive
- September 2016
- August 2016
- June 2016
- May 2016
- April 2016
- March 2016
- February 2016
- January 2016
- December 2015
- November 2015
- October 2015
- September 2015
- August 2015
- July 2015
- June 2015
- May 2015
- April 2015
- March 2015
- February 2015
- January 2015
- November 2014
- October 2014
- September 2014
- August 2014
- June 2014
- May 2014
- April 2014
- March 2014
- February 2014
- January 2014
- December 2013
- November 2013
- October 2013
- September 2013
- August 2013
- July 2013
- June 2013
- May 2013
- April 2013
- March 2013
- February 2013
- January 2013
- December 2012
- November 2012
- October 2012
- September 2012
- August 2012
- April 2012
- March 2012
- February 2012
- January 2012
- December 2011
- November 2011
- October 2011
- September 2011
- August 2011
- March 2011
- February 2011
- January 2011
- December 2010
- November 2010
- October 2010
Here is another drawing, this time its of Velma from the children's cartoon Scooby Doo. I also did some quick simple shading. That's all for now, thanks for reading!